The Ultimate Challah Recipe

I did it folks!!!! I found the challah of my dreams!! After multiple unsatisfactory attempts, I have found the perfect challah recipe. However, I didn’t do this on my own. After my previous attempts, I sent out a cry for help to my lovely friend Laura and she sent me the challah recipe from her family. So thank you Laura!! This challah recipe is absolute perfection. It creates beautiful, fluffy, and rich bread. One of these rolls was enough to satisfy my appetite! They are pretty simple to make, taking far less time to rise/prove than other recipes. I’ve changed one or two things like proving times within the recipe but otherwise credit goes to the original creator! Now let’s dive into a few technical parts to the bread before we get to the recipe.

This recipe calls for SEVEN egg yolks with an additional egg beaten for the egg wash before baking. Seven eggs is a LOT of eggs but even that number of eggs is not sufficient to make the dough the startling yellow that it is in store bought versions of challah. However, I discovered the dirty secret of commercial challah baking and it is simply food dye. Challah relies on egg yolks for its hallmark richness but the cost of eggs can add up for bakers. To cut down on costs, many commercial bakers use yellow food dye to get the yellow color that most associate with really rich challah. I was a little bummed when I learned this but it also made me set my sights on more realistic expectations for my challah. One issue with using seven egg yolks in a challah recipe is that you have to separate them all out. I would recommend doing the separation while the eggs are cold. Cold eggs have firmer yolks that are easier to separate. There are three methods to do this and I suggest trying all of them to find which one you’re most comfortable with. You should also use at least three bowls while you’re separating egg yolks, one for the current egg that you’re working with, another for the leftover egg whites, and a third for the yolks. Doing it this was makes more dishes but it’ll ensure that you don’t get any cross contamination between the whites and the yolks.

The first method is using your hand. This is a good technique to start with because it doesn’t require a ton of skill and gets you really familiar with the egg and its white. All you have to do is crack the egg over a bowl and put the yolk in the palm of your hand while you sort of jiggle the white into the bowl. The white will slide off and you’ll be left with your yolk. The second method uses the shells. Once you crack the egg (which you should do firmly to give the shells clean edges), you juggle the egg between the shells to get the white to slid off. I would recommend turning to youtube to see how this is done. The third method uses a clean and empty plastic, disposable water bottle. With this method, you crack the egg into a bowl and then use the opening of the empty water bottle to suction up the yolk and transfer it to another bowl. This can take some practice and time but it’s the most fun and cleanest of all the methods. Please save your egg whites once you’ve separated out your yolks. Egg whites will stay good in the refrigerator for three months and can be used in omelets or macarons or many other confections! However, egg yolks will only stay good in the refrigerator for three days and their quality will degrade with each passing day. So if you’re thinking of separating your yolks ahead of time, I beg you to reconsider! Also, I would always recommend having backup eggs around. Even the best pastry chef will puncture an egg yolk or two while separating eggs and it’s best to be prepared for this possibility!

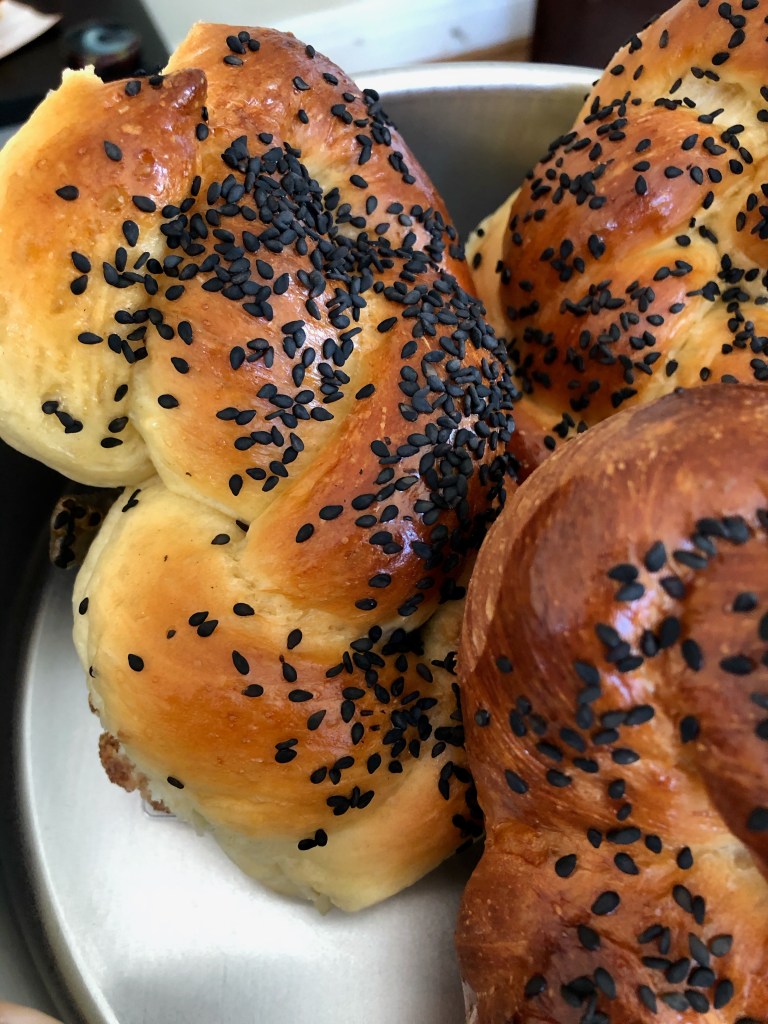
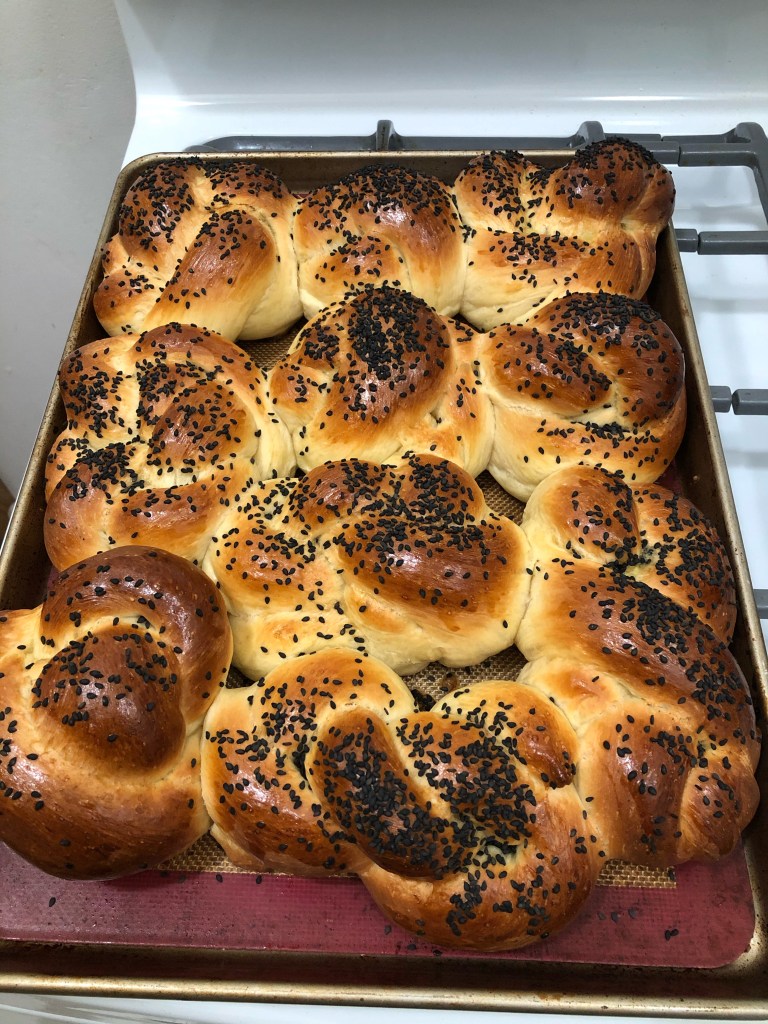
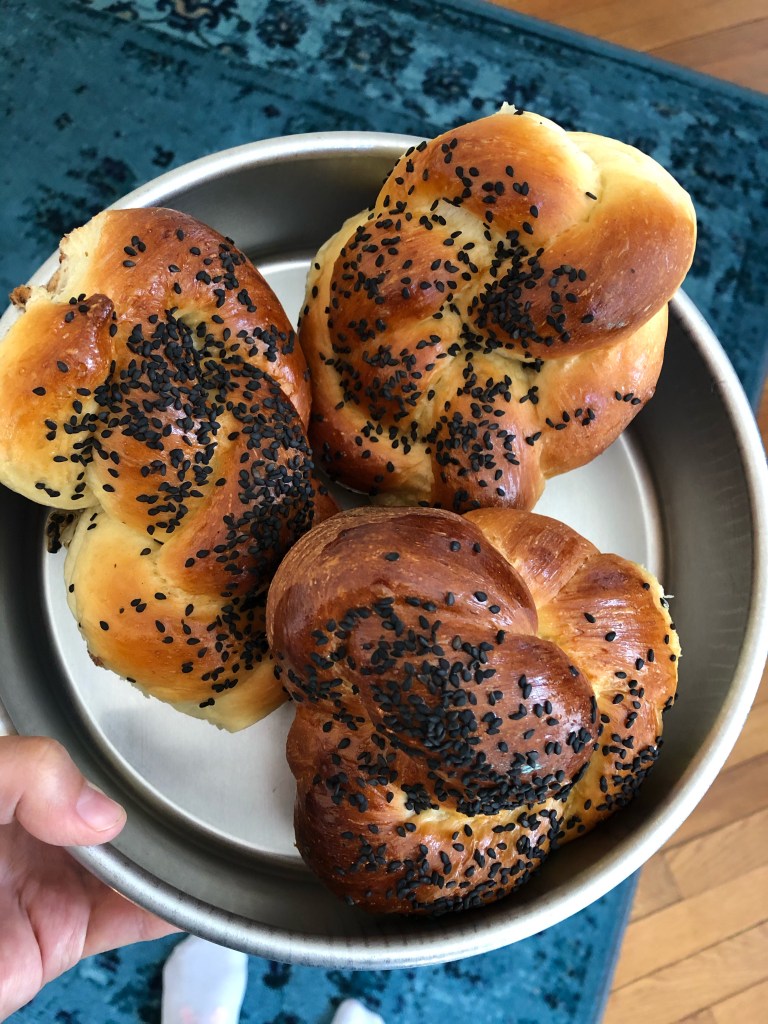
My last few words are about braiding the challah strand. I really like to make knotted challah rolls but I have yet to perfect my knotting method. When I make large loaves, I usually do three or nine strand braids which are not terribly complicated. A three-strand braid is just like doing a regular hair braid while a nine strand braid consists of three separate three-strand braids that are braided together. There are lots of youtube videos on braiding so if you’re itching to get more complicated, the internet can provide guidance! At the moment for my rolls, I do a simple square knot and tuck the ends underneath my rolls. I’m trying to get more complicated but have had issues with the bread bursting through its shape while in its second prove. If anyone has a suggestion, put it in the comments below and I’d be happy to try it! Otherwise, just do what you want to do with the challah. It’s a very forgiving bread and will be tasty regardless of its final form as long as its baked through! Happy baking!

Challah Bread Recipe

  • 1 tablespoon instant or dry active yeast (If you’re really fancy, use SAF gold yeast, it’s for enriched breads like challah)
  • 227 grams (1 cup) warm water (75-95F)
  • 4 cups bread flour
  • 7 large egg yolks
  • 40 grams (1/4 cup) granulated sugar
  • 1 teaspoon kosher salt (I’ve started using flaky kosher salt and have liked the results a lot!)
  • 6 tablespoons canola oil (I used sunflower oil and it also worked great so feel free to substitute!)
  • 1 large egg beaten with a tablespoon of water
  • Black sesame seeds or Demerara (raw) sugar
  1. Combine bread flour, yeast, egg yolks, sugar, salt, oil, and water together. Mix until the dough is almost cohesive then turn out of the bowl onto a kneading surface. Knead for up to five minutes or until the dough is smooth and springs back when poked with a floured finger.
  2. Oil a large bowl and place the dough inside. Cover and let rest 1 1/2-2 hours or until it has doubled in volume.
  3. Punch down the dough. Divide into three or nine if you’re making a three or nine strand loaf. For large rolls, divide dough into 10. For smaller rolls divide into 15 or weigh out 45 gram pieces of dough. Cover and let rest 15 minutes.
  4. Once rested, roll dough out with your hands to 12-24 inch strands. For smaller rolls, 12 inches is sufficient but for other braids, 24 inches is needed. Don’t force the dough to stretch, it will shrink back once left alone so decide on the length as you roll out each piece of dough. Shape the dough and place it on the baking sheet where it will be baked.
  5. Once shaped, let rest 1 hour for its final prove.
  6. During its final prove, preheat over to 375F for loaves and 400F for rolls. Prepare the egg wash by beating together an egg and some water to thin out the consistency. Before baking, brush the rolls all over with the egg wash and sprinkle on topping of choice like black sesame seeds, white sesame seeds, or Demerara sugar.
  7. Bake. Baking time will vary on the loaf or roll type. Loaves will bake 35-45 minutes and if extremely large, may take 50 minutes and you may need to cover with foil to prevent it burning. Large rolls will take 15-20 minutes to bake while smaller rolls will bake 10-13 minutes. To check for doneness, remove the bread from the oven and roll onto its top. Knock the bottom of the roll or loaf. If you hear a hollow sound, it is done. If no hollow sound is heard, put back into the oven for another five minutes.
  8. Let cool on a wire rack and enjoy!
Advertisement

Bacon, Chive, and Cheddar Scones

I made this recipe over the summer, somewhat successfully but I actually lacked the proper amount of chives that the recipe called for. Last week, I got a massive bunch of chives within my CSA box and immediately thought of this recipe to put them to use. A quick side note on CSA boxes! Over the summer, I worked in food systems and nutrition research and found out that CSA boxes were not only a great way to help a local farm but they also help you to reduce the carbon footprint of your food because it is sourced locally and it has helped me a ton in my journey to become a better cook. CSA stands for community supported agriculture and it’s much more common that I had previously thought. The pandemic has actually increased interest in this and many farms are unable to keep up with the demand!!!

It was hard to find an open slot when I came back to school in the fall but I’ve been getting a weekly “Ugly” share from Moon Valley Farm which delivers to various locations in Baltimore. My share or box usually contains various vegetables with the occasionally bunch of fruit and it has encouraged me to really broaden my culinary horizons. One of the veggies that has come pretty consistently in my boxes the past few weeks is okra, which I had never ever cooked or eaten. Now, I’m enjoying an okra and tomato stew for lunch that I never could have made a few months ago! I really enjoy my CSA box but I also have the time to dissect and cook through my whole box. It can be really tough at first but I have learned a lot and love getting my box every week. I encourage everyone to look into purchasing locally sourced agriculture in any form, not just from a CSA. It both reduces your carbon footprint and encourages you to eat seasonally! Although, I am still tempted by the sales of pineapple and lemons from far-away countries so even my food purchasing process has quite a bit of leeway!

Back to the baking aspect of this blog! This recipe is based off a recipe that came in my King Arthur Scone pan that was a Christmas gift from my lovely parents. I did make a few changes to the recipe to fit it to what I had in the fridge and to lighten up the recipe a little. American scones are a pretty heavy affair, full of butter and cream. Because I had some frozen low fat buttermilk, I defrosted that and used it in the recipe and it worked out really well! I often have to buy dairy for recipes but I don’t really drink it or use it in other recipes so I’ve taken to freezing it in specific quantities and defrosting it as needed. Fresh dairy is always preferable but if I’ve learned anything from the pandemic, it’s that you must be flexible! On a college budget, I’m always looking for ways to stretch my grocery budget and my freezer has been the greatest thing ever for helping me do that. I also substituted the regular bacon for turkey bacon. It’s not as greasy and I think it adds plenty of flavor without some of the fat. I’ll put the original recipe guidance down below in parentheses next to my additions. I really recommend not doing the recipe if you don’t have enough chives or green onions. The two are interchangeable and you could probably even use half of each if you don’t have enough of them individually. They really add just a subtle onion flavor that complements the overall scone. These come together super quickly and are a delicious breakfast treat! They can also be frozen and baked at will, just freeze the dough before you get to the step where you brush them with buttermilk/cream. Let me know if you try the recipe in the comments below and happy baking!

Bacon, Chive, and Cheddar Scone Recipe

  • 241 grams (2 cups) All Purpose flour
  • 1/2 teaspoon kosher salt
  • 14 grams (1 tablespoon) baking powder
  • 2 teaspoons sugar (offsets bitterness of baking powder, please use)
  • 57 grams (4 tablespoons) cold, unsalted butter
  • 113 grams (1 cup) coarsely grated or diced cheddar cheese
  • 14 grams (1/3 cup) chopped fresh chives
  • 227 grams (1/2 pound) turkey bacon, cooked, cooled, and crumbled (original recipe calls for regular bacon)
  • 3/4 cup + 2 tablespoons low-fat buttermilk (original recipe calls for heavy cream)
  1. Preheat oven to 425F with a rack in the middle or upper third of the oven. Line a cookie sheet with parchment paper.
  2. Whisk together the flour, slat, baking powder, and sugar. Work the butter into the flour mixture until the mix is unevenly crumbly with the butter in pea sized pieces.
  3. Mix in cheese, chives, and bacon until evenly distributed.
  4. Add 3/4 cup of buttermilk or cream, stirring to combine. Try to squeeze the dough together and if it won’t stay cohesive, add a little more buttermilk or cream.
  5. Transfer dough to lined cookie sheet and pat into a 7 inch disk about 3/4 inch thick. Use a knife or bench scraper to cut the disk into 8 wedges. Separate these wedges a little and brush them lightly with buttermilk or cream.
  6. Bake scones in the middle or upper third of oven for 22-24 minutes or until golden. Remove from oven and cool them in the pan they were baked.

Chocolate Peanut Butter Cookies

As the school year has started, I’ve been baking up a storm and am loving it! I’m hoping to come out with a book review in a week or so but I’m finishing up a monster of a book that I’ve been reading intermittently since April! While I finish that up, I thought I could distract you all with yet another delicious cookie recipe courtesy of King Arthur Flour. Now, for my friends out there who are allergic to nuts, this recipe may not be for them but I always encourage recipe substitutions in the name of creativity so if anyone finds a good peanut or nut free alternative to the peanut butter in the recipe, let me know if the comments below! I was inspired to look for cookie recipes so that I could share some with my godmother Sue, who has been very kind in testing out several of my blog recipes.

This was a relatively simple recipe, I didn’t run into any huge logistical or recipe errors which is great! The recipe requires butter to be at room temp and unlike the brown sugar and maple cookies, the butter can be microwaved thirty seconds to forty five seconds to soften it. The recipe will be quite stiff with the peanut butter addition so the butter can be almost melted if you need to microwave it. To make these cookies less stiff, the recipe calls for a tablespoon or two of water. You could even add another tablespoon if you need to and don’t be alarmed when the dough gets really stiff after you mix all the ingredients together.

I normally mix my dry and wet goods separately but I know that some people along with myself sometimes just throw everything in the bowl and mix. In this recipe, try to use two separate bowls for wet and dry goods if you can because the peanut butter will cause everything to stick together and not mix well. Final note is that I used chocolate chips in the cookies because they were all I had on hand. They do taste great in the cookies but you don’t get as much peanut butter without using the peanut butter cups recommended by the original recipe. So if you like a more chocolate than peanut butter, use chips but if you love that PB then go find some mini peanut butter cups to use! I hope that you enjoy this recipe and follow any of the above mentioned tips!

Chocolate Peanut Butter Cookies

  • 177 grams (1 1/2 cups) All Purpose flour
  • 43 grams (1/2 cup) unsweetened cocoa
  • 1/2 teaspoon baking soda
  • 1/4 teaspoon kosher salt
  • 99 grams (1/2 cup) granulated sugar
  • 106 grams (1/2 cup packed) brown sugar
  • 113 grams (8 tablespoons) unsalted butter, softened
  • 67 grams (1/4 cup) smooth peanut butter
  • 1 teaspoon vanilla extract
  • 1 large egg
  • 28 grams (2 tablespoons) water
  • 255 grams (1 1/2 cup) mini-peanut butter cups or semi-sweet chocolate chips
  1. Preheat oven to 375F and line two baking sheets.
  2. Whisk together the flour, cocoa, baking soda, and salt.
  3. In another bowl, beat together the sugars, butter, and peanut butter until light and fluffy.
  4. Beat in the egg, vanilla extract, and water to that bowl and then stir in the dry ingredients.
  5. Stir in the mini peanut butter cups or chocolate chips until blended well.
  6. Scoop out tablespoon sized balls of dough and place onto the lined baking sheets. Flatten the cookies to 1/2 inch thick (this is so they will bake through)
  7. Bake 8-10 minutes or until set and you smell chocolate (If you have a hot oven, baking time may only be 7 minutes)
  8. Remove from oven and cool on a wire rack and enjoy!

Buttermilk Granola Muffins

I made these lovely muffins a few weeks ago during a particularly fruitful burst of baking. I always have leftover buttermilk from soda bread or other recipes that just sits in my fridge for weeks. With this recipe, I was finally able to use the leftover buttermilk but never fear, this recipe can be totally vegan if you choose or if you just lack buttermilk. The buttermilk in the recipe can be substituted for any type of fruit juice but I would suggest one that corresponds to the granola that you choose to use for this recipe. This recipe was an win for me because I’ve struggled with muffins in recent years. I can make them just fine from a mix but I haven’t found a good “from scratch” muffin recipe in a while. I’m so glad that I came across this recipe, it produced a ton of muffins which I’ve been enjoying for breakfast.

One note for the recipe concerning the type of granola used. Being a student on a budget, I could have made my own granola (time consuming but perhaps cheaper) or buy the cheapest option from the local grocery store. I choose the store route and have some regrets about the granola that I got which which was basically honey and vanilla flavored oats….So, I would recommend choosing your granola a little more carefully than I did. Go with something with larger clusters or with lots of dried fruit. I wish you luck and happy granola hunting if you decide to make these delectable muffins!

Buttermilk Granola Muffin Recipe

  • 227 grams whole wheat flour (2 cups)
  • 213 grams brown sugar, packed (1 cup)
  • 3/4 teaspoon kosher salt
  • 1 teaspoon baking powder
  • 1/2 teaspoon baking soda
  • 3/4 teaspoon ground cinnamon
  • 99 grams prepared granola (1 cup)
  • 1 teaspoon vanilla extract
  • 67 grams vegetable oil (1/3 cup)
  • 340 grams low-fat or full-fat buttermilk (1 1/2 cups)
  1. Preheat the oven to 400F and grease a muffin tin. If using cups, making sure to grease those as well, the batter will stick.
  2. Whisk together the dry ingredients. In a separate bowl, whisk together the vanilla extract, vegetable oil, and buttermilk.
  3. Pour liquid ingredients into the dry and stir until just combined
  4. Spoon batter into cups until 2/3 full.
  5. Sprinkle with additional granola and bake for 16-18 minutes or until a toothpick comes out clean.
  6. Remove muffins from the oven but not the tins. After five minutes or when cool enough to handle, transfer the muffins to a rack to a cool. Serve warm or at room temperature.

Vegan Salted Chocolate Chip Cookies

I love chocolate chip cookies but I had never attempted a vegan cookie recipe! I had a lovely socially distanced picnic with friends last week and I wanted to bring a baked good to share. In these times of socially distanced socialization, I’ve loved baking for other people to show my love rather than giving them the big hugs that I’d really like to give them! One of my friends is a vegan and as I have been trying to incorporate less animal products in my own life, I thought it was a great opportunity to try out this recipe from King Arthur Flour. Always a great resource, King Arthur Flour didn’t fail me with this wonderful recipe for chocolate chip cookies that taste absolutely delicious and don’t compromise on any part of a cookie!

These cookies are specifically salted right before they are baked and this is the most important part of the recipe. I do have a sweet tooth but with the use of oil in these cookies, they can be a little overpoweringly sweet if you omit the salt. You don’t had to use very fancy salt either, I just sprinkled on kosher salt and whacked them in the oven. I really prefer kosher salt for baking, whether or not it’s called for by the recipe. Although most table salt is iodized, providing an important micronutrient in your diet, it doesn’t pack the same flavor punch that I find when I use kosher salt. Also, I taste kosher salt as more salty if that’s possible so I end up using less overall. Just to be careful, make sure that you have iodized table salt out for regular usage but I recommend kosher salt for most cooking and baking needs.

Some of the reviews on this recipe complained of spreading but I didn’t find this was the case at all. I refrigerated my dough for several hours (roughly 18) and froze the dough for about twenty minutes after I had shaped it. Using a tablespoon to measure the dough out, it makes about 27 cookies but only 26 made it into my oven! You can also add in sourdough discard or make them gluten free! For the discard addition, you can add in 70 grams of discard and omit the additional water the recipe calls for. You may also be able cut the flour amount but I’m not sure I could give an exact amount. To make this gluten free, substitute all the flour for almond meal and be careful to mix until the dough is just coming together. I hope you enjoy this recipe as much as I did and let me know how any of the variations go in the comments!

Vegan Salted Chocolate Chip Cookies Recipe

  • 241 grams (2 cups) All Purpose flour
  • 1 teaspoon baking powder
  • 3/4 teaspoon baking soda
  • 1/2 teaspoon kosher salt
  • 213 grams (1 1/4 cup) bittersweet chocolate chips
  • 99 grams (1/2 cup) granulated sugar
  • 106 grams (1/2 cup) packed brown sugar
  • 106 grams (1/2 cup + 1 tablespoon) vegetable oil
  • 71 grams (1/4 cup + 1 tablespoon) water
  • Sea salt or Kosher Salt to garnish
  1. Whisk together the flour, baking powder and soda and salt. Add chocolate chips and whisk till they are coated with flour.
  2. In a separate bowl, whisk the sugars with the oil and water until smooth. This can take a minute or two but be patient!
  3. Add flour and stir until just combined with no visible flour spots.
  4. Cover with plastic wrap and refrigerate 12-24 hours.
  5. To bake, preheat oven to 350F and line two baking sheets.
  6. Remove dough from refrigerator and using a tablespoon to measure, drop on the lined sheet. Leave about 2 inches of room on each side and freeze for 10 minutes. (They can be frozen closer together but make sure they have the space when baking)
  7. Sprinkle with salt (Do this!!! I forgot for the first batch!!) and bake for 12-14 minutes. If you like your cookies softer, bake for no more than 13 minutes. Bake a few minutes past 14 if you enjoy a crunchy cookie.
  8. Remove and cool completely before serving. Enjoy!

Savory Zucchini Scones

So I’m not sure how appropriate it is to call these scones but they sure are delicious! I ended up finding this recipe after discovering that my boyfriend had a container of buttermilk that was going to need to be used within the next two weeks. While I do love my Irish Soda Bread, I wanted to try and find something different that would use the buttermilk. They use the same elements as a traditional scone but they don’t have the same flakiness, I believe this is due to the zucchini. I made these over the past weekend and loved how much it tasted like pizza. I’ve only ever made one other savory scone and wasn’t quite sure how these would turn out. They were more of a hearty scone, probably due to the massive size of most of them and would make a good breakfast or lunch. They are slightly complicated so only attempt if you’ve had a little bit of experience with pastry or biscuits.

These are absolutely packed with flavor, from the zucchini to the sun dried tomatoes to the massive amount of grated Asiago!!! There are several technical pitfalls in this recipe and I was unable to avoid some of them but they still came out delicious! One issue is with the zucchini. While it makes a hearty addition to the scones and adds moisture, zucchinis add wayyyyy too much moisture most of the time. I squeezed out a great deal of moisture with a french press but I could have squeezed out even more. I found that the french press worked well but that I should have put the shredded zucchini inside the press in much smaller batches. You simply cannot get all the moisture out if you have too much in there. The other issue I had was underestimating how much dough this recipe makes. When I originally read about this recipe in the Skinnytaste blog, I thought it would make 12 mini scones. Oh boy, I was wrong on that! It makes 12 full size (generously portioned) scones and I really should have used a bigger mixing bowl. A food processor also really helps in this situation. I used to to both shred the zucchini and cut the butter into the dry ingredients. If you don’t have one, this can be done by hand so don’t get discourage but it will take a bit longer.

Savory Zucchini Scone Recipe

  • 3/4 cup cold buttermilk (I use low-fat but I’m not sure how much it matters here)
  • 1 large egg, beaten
  • 1 cup All Purpose flour
  • 1 cup Whole Wheat flour (You could use only All Purpose but I like the whole wheat)
  • 1 1/2 teaspoons baking powder
  • 3/4 teaspoon kosher salt
  • 1/4 cup or 4 tablespoons butter, cold and cut into small pieces
  • 1 cup shredded zucchini, squeezed of moisture
  • 2 ounces Asiago cheese, shredded (Could substitute Pecorino Romano or Parmesan)
  • 2.75 ounces sun dried tomatoes, minced (about 2/3 cup)
  • 1 1/2 tablespoons fresh rosemary, chopped
  • Extra buttermilk to coat
  1. Preheat oven to 375F. Spray baking sheet with non-stick or line a baking sheet.
  2. Combine the buttermilk and egg in a bowl, stirring with a whisk.
  3. Combine flours with baking powder and salt, stirring with a whisk.
  4. In a separate bowl, combine zucchini, sun dried tomatoes, cheese, rosemary and set aside.
  5. Cut in chilled butter into the dry ingredients, by hand or using a food processor until it looks like coarse meal.
  6. Gently fold in the ingredients from step four. Make a well in the middle of the dough and add the buttermilk mixture.
  7. Fold the mixture together until it starts to come together then turn out onto a floured surface. Knead lightly then form into a 10″ circle.
  8. Cut into 12 wedges and brush lightly with buttermilk on the top of each wedge. Place on the lined sheet and bake 25-30 (up to 35) minutes.
  9. Remove from oven and let cool. Eat warm and enjoy!

Sourdough Discard Pizza

This is one of my favorite discard recipes. It’s incredibly versatile and can feed a family really easily. During this past summer, I made this recipe at least once every two weeks and it was a hit every single time. This recipe is from King Arthur Flour which has a fantastic repository of sourdough discard recipes. With this recipe, you are able to merge the instincts of a chef and a baker because both creativity and precision are needed to make this recipe a success. For the flavor combinations, go with whatever you or your family like the most. At the start of summer, I paired chicken sausage with broccoli or whatever frozen vegetable was around and I’ve recently taken to pairing Italian chicken with mushrooms which is a delicious combination that I never really appreciated properly! The dough in this recipe can be paired with whatever is in your fridge; just come up with a central element or two and the dough can be tailored to compliment it.

The technical side of this recipe isn’t daunting but the little things can get you. I often pour spices into the dough without proper measurement because it’s more of gut feeling at this point. While fun, improvisation with the dry ingredients can get you into hot water with your balance of wet and dry. If adding more than 5 grams of extra dry ingredients, add a little more water, just enough to make the dough come together. My discard can also be a little sticky sometimes and that mean needing to add more or less liquid to your dough. Also, in terms of using a pizza pan, this most recent bake was the first time that I had used one and I adored it! If you end up making pizza regularly, a pizza pan is a wonderful addition but it’s also another very large pan that will need a home in your kitchen. A regular sheet (half or quarter depending on recipe size) will do just fine. However, I would recommend getting a pizza cutter; they are incredibly useful and I now use mine almost everyday. This recipe can also be halved easily to make a smaller pizza, the pictures on this post are from a halved recipe. If halved, you may need to add slightly more water when mixing. However you get to making your pizza, enjoy the process! Making pizza dough is easy enough to do with the whole family or with a loving partner so have fun and go make that dough!

Sourdough Discard Pizza Recipe

  • 227 grams (1 cup) discard sourdough starter
  • 113 grams (1/2 cup) warm water
  • 298 grams (2 1/2 cups) All Purpose flour
  • 1 teaspoon kosher salt
  • 1/2 teaspoon instant yeast (use 3/4 teaspoon for active dry)
  • Assort spices or pizza dough flavoring (This is more of a gut addition, I add spices based on the flavorings I enjoy, my most common additions are onion powder, garlic powder, and oregano or Italian seasonings)
  1. Combine all ingredients and knead for about seven minutes by hand or with a mixer. The dough should be smooth and not sticky.
  2. Roll the dough into a ball and place into a greased container. Let rise 4 hours. For a quicker rise, double the amount of yeast)
  3. Once risen, the dough can be divided to make two twelve inch pizzas or one large pizza. Either way, grease a pizza pan or sheet pan and stretch it to desired shape.
  4. Let rest 15 minutes. If the dough has creeped back any, you can re-stretch it. From here, you can bake immediately or wait until the dough reaches your desired thickness. I usually allow an addition 20-30 minute rise to get a nice solid crust. Cover the dough during its rise to prevent a dry crust forming over the dough.
  5. Preheat oven to 450F.
  6. Add sauce and toppings to pizza but hold back the cheese. Bake un-cheesed pizza for 5-10 minutes (shorter for thinner pizzas).
  7. Remove from oven and add cheese then bake a further 5-7 minutes.
  8. Remove from oven and enjoy! It stays good in the refrigerator for up to five days!

Sourdough Discard Crackers

These crackers are so GOOD! I had not made a ton of crackers before this summer but discovered that it was a great way to use up my discard and began making them all the time! Earlier in the summer, I would make these and they would last a week or two, but with my brother home, my parents are lucky if they can get a taste before they disappear into the black hole of my brother’s appetite! My parents and I use them for our cheeseboard but my brother prefers to eat them as snacks throughout the day. It’s a versatile cracker that you can do a lot or a little with and it’ll turn out really tasty each time!

That being said, this recipe is adapted from the King Arthur Flour website but I’ve made some pretty significant changes. One is to the type of flour used; while the original recipe used whole wheat flour, I’ve started to substitute with einkorn flour and I love the additional flavor! The einkorn flour was purchased for another recipe but I think I used it all on these crackers because I couldn’t get enough of the slightly cheesy taste these crackers had. I also have started to substitute olive oil for the butter that was used in the original recipe. Often times, you can substitute one type of fat (such as butter) for another (olive oil) in recipes and it won’t change the final product very much. Other times, if you substitute a fat, you could ruin a whole recipe so do so judiciously. I switched to using olive oil because it cut down on the amount of time that the dough needed to rest before being rolled and cut. I would also highly recommend that if you end up making these crackers frequently, get a pizza cutter. It makes a world of difference when you’re trying to cut the dough into cracker size. My crackers are often not the neatest in the world because I cut them quickly but they’re still delicious!

A note on the flavor combinations. You can do a LOT with these crackers! My brother’s favorite flavor combination is dill with lemon vinaigrette and sea salt but there’s many other combinations to be had. Another favorite is rosemary and orange or thyme and lemon. I try to use fresh herbs but the dried often pack more punch so if using fresh, double or triple the amount of herbs. I’ve also experimented with adding in a little cheese powder but I found that is was both unnecessary with the einkorn flour and often caused the crackers to burn a little faster than usual. Be creative and have fun, these crackers provide a great base for you to experiment with!

Sourdough Discard Crackers Recipe

  • 113 grams Einkorn or Whole Wheat flour (1 cup)
  • 1/2 teaspoon kosher salt
  • 248 grams sourdough discard (1 cup)
  • 1/2 tablespoon dried herbs of choice (up to 2 tablespoons for fresh herbs)
  • 57 grams olive oil (1/4 cup) (Can use butter)
  • Additional olive oil and kosher salt to finish
  1. Mix together all ingredients to make a smooth, non-sticky, cohesive dough. May have streaks if using olive oil, that’s okay!
  2. Divide in half, put onto parchment-lined baking sheets and let rest at room temp up to an hour.
  3. Preheat oven to 350F.
  4. Flour a rolling pin, the dough, and the parchment that it’s resting on. Roll out to 1/16 of an inch. Paint lightly with olive oil and sprinkle salt onto the dough. Cut into 1 inch squares with a pizza cutter or a knife.
  5. Prick each cracker with the tines of a fork before putting it in the oven.
  6. Bake for 25 minutes. Halfway through, reverse the placement of the pans in the oven so that the top goes on the bottom and the crackers that were closest to the oven door are now closer to the inner wall of the oven.
  7. Remove once baked and let cool on a wire rack. Once cool, eat and enjoy or store in an airtight container. For full flavor, they last no longer than a week out in the open but if you’re okay with a lil less flavor, they’re good for up to two weeks.

Grandma’s Date Nut Bread

This is one of the more personal recipes that I could possibly share. This recipe, as the title says, comes from my grandmother. For years, I heard my mother longingly speak of her mother’s date nut bread, which would be made as Christmas presents for loved ones. During our extended sheltering at home during the pandemic, my mom and I found a big family recipe book as we cleaned out the garage, which just so happened to contain a recipe for my grandmother’s famous date nut bread. I feel really lucky that we were able to find the recipe book in the first place and reading through it helped to connect me to my mother’s side of the family. My grandmother passed away shortly after my birth and I’ve always wished that we could have had just a little bit more time. While making this recipe, I felt just a little bit closer to my grandma.

This recipe is definitely a little interesting to make but is not hard at all! One of the first parts of this recipe calls for boiling water mixed with baking soda and dates. While I couldn’t find any real reasoning for this in the rest of the recipe, after a little bit of internet sleuthing, I surmised that the water is meant to help the baking soda dissolve and not get stuck on the dates. I also think that this recipe may be meant for two small loaf pans rather than the medium sized loaf pan that I used. In the recipe notes, it said that it made two loaves, but I found it barely filled my tin. I almost made it in my individual scone pan from King Arthur which may have helped it to bake quicker and more evenly. Due to the size of the pan I baked it in, I had to add an extra 20 minutes to the baking time during which the edges started to get a little crispy. I really enjoyed this recipe and it made me smile to see my mother very enthusiastically devouring the date bread! I hope you enjoy baking but be warned, it takes longer to bake than it does to assemble the ingredients!

Grandma’s Date Nut Bread Recipe

  • 1 cup dates, chopped and de-pitted
  • 1 cup boiling water
  • 1 teaspoon baking soda
  • 1 cup granulated sugar
  • 2 eggs
  • 1 tablespoon shortening/butter (original recipe called for shortening but I used butter this time)
  • 1 cup nut meat (I chopped pecans but any sweeter raw nut would work, candied nuts may be too sweet to eat in the bread)
  • 1 1/2 cup All Purpose flour
  • 1 teaspoon vanilla extract
  1. Preheat the oven to 325F.
  2. Combine the dates, boiling water, and baking soda and let stand while doing step 3
  3. Cream together sugar, eggs, and shortening/butter. Ensure it is thoroughly mixed and almost fluffy.
  4. Combine dates and sugar mix. To the combined mix, add the nut meat, flour, and vanilla extract.
  5. Pour into loaf pan and bake 1 hour, 20 minutes if using a large loaf pan or 1 hour for smaller loaves. Check for doneness by sticking a knife in the middle of the loaf, if it comes out clean then it’s ready to come out of the oven.
  6. Let loaf cool and enjoy warm or at room temperature with a bit of butter slathered on top or just plain if you like!