So I have to admit that the cover photo for today’s blog post was graciously taken by the recipients of this cake. Two of my friends recently celebrated their marriage and being a big baker, I asked if I could bake them a yummy if slightly messy cake. I had originally planned to do a butter cake with ganache frosting, a classic bumblebee cake. Looking around my pantry, I noticed I had a boxed mix of devil’s food cake that I had been dying to use and this seemed like a a perfect opportunity! Using a boxed cake mix meant that I was able to take my time with the other parts of the cake that added a lovely touch and taste. I should have taken a little extra time with the royal icing lettering but hindsight is 20/20! The royal icing was a little on the runnier side and smooshed together a little but I see that as protecting the privacy of the intended recipients!
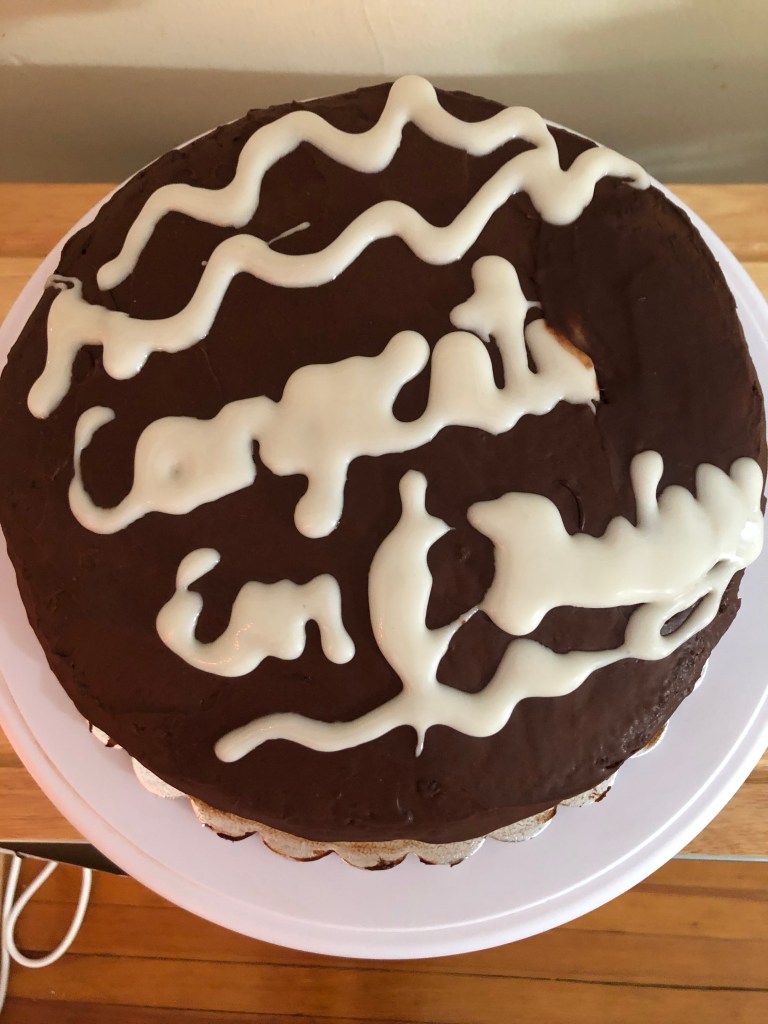
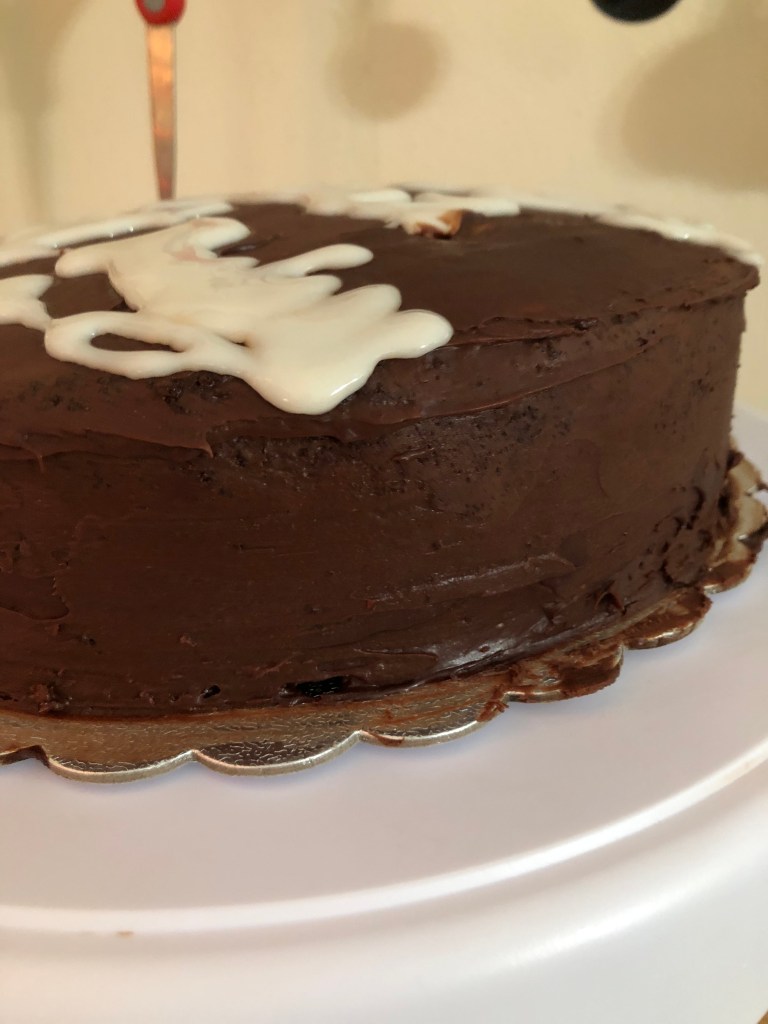
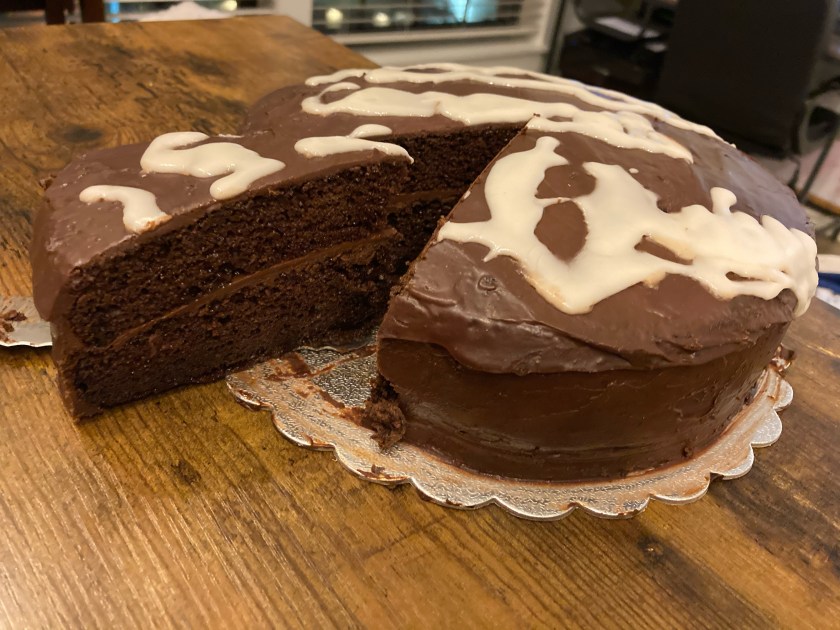
This cake has everything! Two layers of delicious cake with a simple syrup for additional moisture with a ganache frosting and royal icing lettering! This cake was actually a two-day process which sounds daunting but I actually think it makes the whole thing much less stressful. Taking the time to properly chill the cake and the frosting allows for the icing process to be much more stress-free! I really enjoyed icing the cake, something I’m not sure that I’ve ever said before. I used to HATE icing cakes; it was always way more trouble than it was worth. I would get crumbs everywhere and could never get a smooth coating of frosting! Let me tell you that has all changed! Equipped with the right tools and knowledge, I’ve become much more at ease in the icing department. The decorations still need a little bit of work but we can’t all be perfect! To properly ice a cake, you really should use a rotating cake stand. I used to hear this all the time and thought it was a bunch of hooey but it really has some merit. It makes it so much easier to get the sides of the cake without taking off too much frosting. Using offset spatulas also helps a LOT. The funky shape to these spatulas helps to evenly distribute the frosting in an intuitive way. One word of wisdom is that the offset spatula should never actually touch the cake. The spatula is used to move around the frosting which ends up covering the cake for you.
This ganache recipe is also one that I have used for a few years but have never taken the time to use all the different bowls and pans that it calls for. Even though it makes way more dishes (which my father never appreciates), this recipe is an easy way to get lovely tempered chocolate frosting for a whole cake. The key to this ganache is the right combination of hot and cold. It’s not as finicky most tempered chocolate recipes but it does need to be warm while being made. The cacao percentage of the chocolate is also very important. The original recipe calls for 62% cacao but I’ve never been able to find that and I use 66% cacao. This is a pretty dark chocolate but doesn’t need much sugar to sweeten it. This recipe won’t really work with a smaller percentage of cacao because the ganache will be too sweet and a little oily. It’s worth the extra couple bucks to get a higher cacao percentage for this recipe. I made this ganache on the morning of the assembly of the cake and put it in the fridge to chill before applying to the cake. One super easy way to soften the ganache if it has chilled is to put in a tablespoon or two of hot water and mix it into the ganache. It helps to soften it without exposing it to the harsh temperature induced by the microwave. Not that I don’t love a good microwave but it doesn’t quite do it for this recipe. I hope that you try this recipe and let me know about your successes or failures in the comments below! Happy baking!
Chocolate Cake Recipe
- For the Cake
- 1 box mix of chocolate cake or your favorite chocolate cake recipe
- For the Simple Syrup
- 1/2 cup water
- 1/2 cup granulated sugar
- For the Ganache
- 10 ounces of 66% Cacao chocolate
- 75 grams (2/3 cup) powdered sugar, sifted
- 170 grams (3/4 cup plus 1 tablespoon) heavy cream
- 2 large egg yolks
- 42 grams (3 tablespoons) unsalted butter, room temperature
- For the Royal Icing
- 113 grams (1 cup) powdered sugar
- 1 tablespoon water
- 1 teaspoon egg white
- Make the cake the day before assembly. Cut the pieces and wrap in cling wrap. Let chill in the fridge overnight.
- To make the ganache, combine chocolate and powdered sugar in a heatproof bowl.
- Put a medium pan of water on to simmer. This will act as part of a bain marie to melt the chocolate so make sure the heatproof bowl fits neatly into the top of the pot before you start the boil
- In a small saucepan on medium heat, warm the heavy cream to a simmer. Once simmering, pour over the chocolate mixture and stir until the sugar is melted.
- Nest the chocolate bowl over the pan of simmering water. Heat the bowl and stir until the chocolate has melted and the mixture is smooth. Remove from heat.
- In a small heatproof bowl, whisk the egg yolks together. Add about a half cup of the chocolate mixture to the eggs and whisk vigorously with a fork to temper. Once shiny, pour back into the chocolate mixture and whisk to combine.
- Add butter to chocolate and stir until smooth. Pour hot ganache through a sieve into a heatproof container and chill for at least 1 hour.
- While the ganache is chilling, make the simple syrup. Combine sugar and water in a small saucepan and heat until sugar has dissolved into the water. Remove to a heatproof container and let cool. (This simple syrup works for cocktails as well so try to make some if you have leftovers)
- Once the simple syrup and ganache have cooled, remove the cake from the fridge.
- Unwrap and gently brush a conservative amount of syrup over each half of the cake. Make sure the cake is moistened but not soaked by the syrup.
- Take the half of the cake that was the top and place on the cake stand. Take a generous dollop of ganache and spread it over this half.
- Once thoroughly frosted, put the bottom half on top, with the side that was in the bottom of the pan on top. This ensures a flat cake.
- Add dollops of ganache around the side of the cake. Using offset spatula, spread a thin layer of ganache over the sides.
- Once a thin layer is created, chill the cake for at least an hour. While it is chilling, make the royal icing.
- For the royal icing, mix all the ingredients together in a bowl. If too thick, add a teaspoon of water until desired consistency. If too runny, add additional powdered sugar until it stiffens.
- Once the cake has chilled, remove from the fridge. Place a generous dollop of frosting on top and cover. Once the top is covered, add ganache to the sides to fully coat the cake.
- To smooth the sides, hold the offset spatula tight to the side of the cake and spin the rotating stand while holding the spatula steady. Push the excess frosting from the sides to the top of the cake. Once there, smooth off into the top layer with the spatula.
- Chill cake for at least 30 minutes before adding words or serve immediately. It will stay well wrapped in the fridge for five days.
- If adding words, put the royal icing into an icing bag with a small writing tip and write out desired message. Make sure the icing isn’t too runny or your cake may look like mine!
- Enjoy your cake!

Looks yummy. How kinds of Your friend and his bride to send pic’s! Great learning on the royal icing too. I still am thinking about the maple pecan shortbread
LikeLike
Sounds wonderful! I like your folksy way of describing the process. And, happy to do the dishes if I get the cake!
LikeLike