I bring you to another one of my mail ready recipes! This was another one of the recipes that I tested out for mailing and according to the recipients, they made it through beautifully! I think the key to mail-able baked goods is both density and freezing! I made these twice because I made a few mistakes the first time. The second time that I made them was about a week before I mailed them and once they were cooled, I froze them in ziplock baggies until I was ready to ship them. Even from Baltimore, they only took two days to make it to the recipients on the West Coast which was fantastic! I was really excited to make these because they combine brownies and pecan pie, two of my favorite baked goods! I found these as a I was going through the New York Times Cooking website. I’ve featured a couple of their recipes now and I cannot stress how much I love their cooking section. In an effort to keep the New York Times alive, the cooking section was monetized and a subscription costs about $45 a year. If you’re able to pay, it is absolutely worth it. Some of their cooking recipes can be hard and unnecessarily complicated but I’ve found that the variety and quantity of recipes is unmatched. This specific recipe is from Melissa Clark, one of the many wonderful writers for the food section. These brownies took a little time to perfect but are a wonderful afternoon treat! As I’ll share below, the first time I made them was a little bumpy but I got the hang of it by the second time.
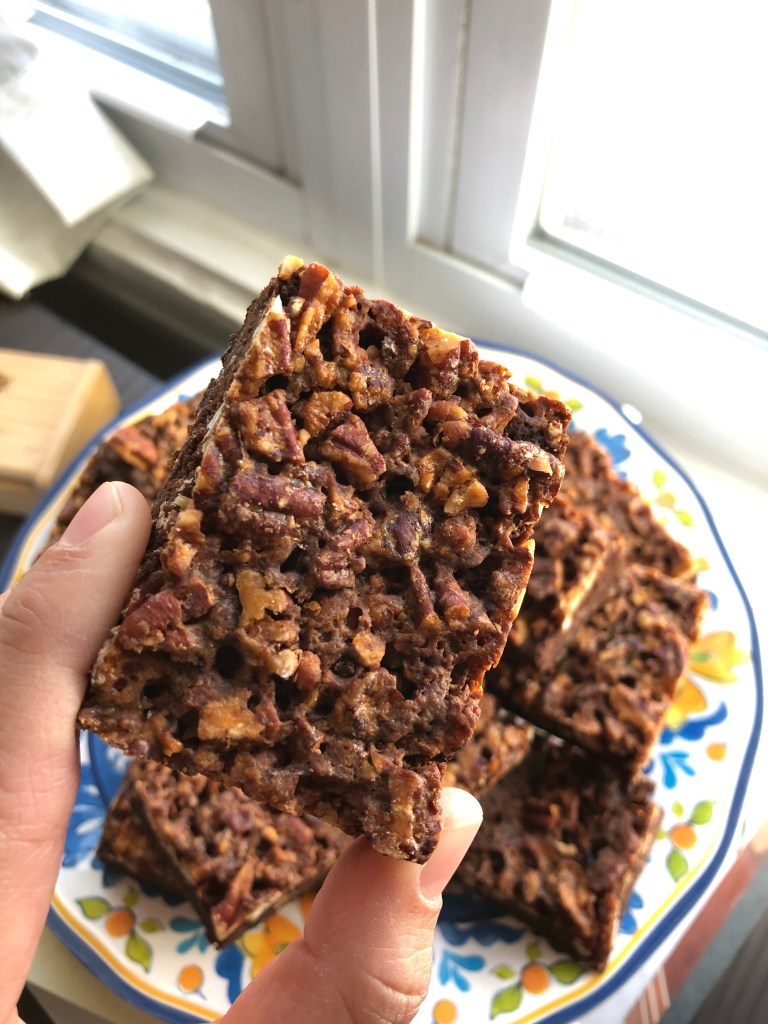
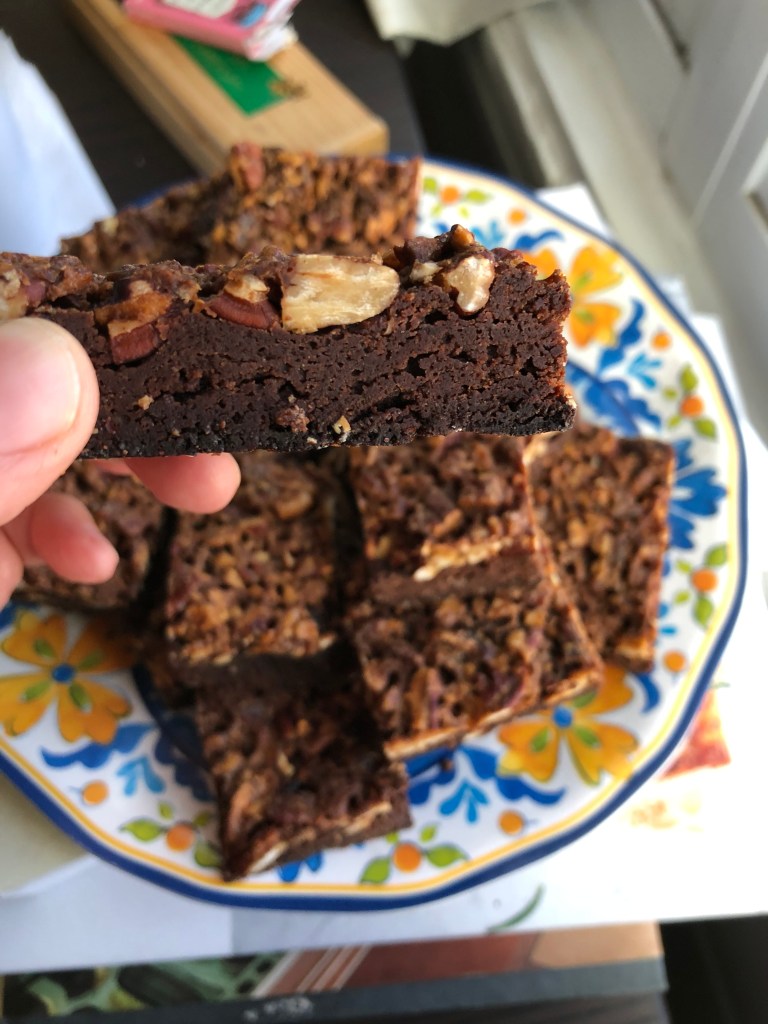
So what went wrong the first time that I made this? A couple things but the biggest issue was the pan size. This recipe calls for a 8 inch square pan, the typical brownie pan. However, the closest thing that I have to an 8 inch square pan is my 9 inch cake rounds. Instead of buying yet another pan, I decided to make the brownies in my rectangular cake pan (8 by 13) which caused them to burn pretty badly because I misjudged the baking time with the thinner layer of brownies in a larger pan. The second time, I used my nine inch cake rounds and cut the brownies into squares once they had cooled a little bit. I also didn’t bake as long on round two because I was worried about burning them. The original recipe said to bake up to 55 minutes for the topping to set. I only baked for fifty minutes and found the fudge-y texture of the brownies to be so yummy that I didn’t want to bake it any longer. Because I chose not to bake it as long, the pecans were liable to coming loose. So a bit of a trade-off but one that didn’t affect my brownies too much after I froze them. I also found the recipe to a be a little bitter both times I made it. The brownie batter itself is very sweet but the topping wasn’t. It may have been because I used whole milk rather than heavy cream in the topping and I think you may have better results if you add an additional tablespoon or two of light brown sugar. So let me know how it goes for you in the comments below and happy baking!
NYT Pecan Pie Brownies Recipe
For the Brownies
- 115 grams (1/2 cup, 1 stick) unsalted butter,
- 115 grams (4oz) unsweetened chocolate, coarsely chopped
- 250 grams (1 /4 cup) granulated sugar
- 2 large eggs, at room temperature
- 130 grams (1 cup+ a lil more) all purpose flour
- 2 tablespoons cocoa powder
- 2 teaspoons vanilla extract
- 3/4 teaspoon fine sea salt
- 45 grams (1/4 cup) semisweet chocolate chips
For the Pecan Layer Topping
- 85 grams (6 tablespoons) unsalted butter, melted
- 60 milligrams (1/4 cup) honey
- 55 grams (1/4 cup) light brown sugar
- 2 tablespoons heavy cream (I used whole milk, if you do so, add another tablespoon of sugar)
- 1/4 teaspoon fine sea salt
- 200 grams (2 cups) toasted pecans halves, roughly chopped
- Heat an oven to 350F. Put the pecans onto a large sheet pan and roast for 8 minutes or until you can smell the nuts. Set on a rack and let cool.
- Once ready to bake, heat oven to 350F. Grease and line an 8 inch square pan with two inches of excess parchment on each side to help lift out the brownies once they’re baked.
- To make the brownies, place the butter and chocolate into a medium pot and place on the stove over low heat. Melt, stirring constantly. Once melted, scrape into a large bowl and mix in the granulated sugar. Let sit until cool to the touch, 4-5 minutes.
- Once cooled, whisk the eggs into the chocolate mixture. Whisk in the flour, cocoa powder, vanilla, and salt. Mix in chips and scrape into the prepared pan. Smooth over the batter into an even layer and set aside.
- Make the pecan layer by whisking together the melted butter, honey, brown sugar, heavy cream, and fine sea salt. Fold in the pecans until well coated. Once mixed, pour pecan mixture in an even layer over the brownie batter.
- Sprinkle lightly with flaky sea salt and bake until the top is set and firm to the touch, 45-55 minutes. Transfer pan to a wire rack to cool completely before cutting into 16 squares.