I could not believe how fast I finished this book. It’s the third in the Chaos Walking Trilogy by Patrick Ness that I posted about about a week ago. Wow!!!! This was a thrilling conclusion to the books and most of it was totally unexpected and the action kept coming! I started on a Wednesday and finished by Thursday evening! I absolutely ripped through this book and am still reeling from the ending!
The last installment of Ness’ trilogy brings us right back to the end of the second book, The Ask and the Answer. Just as Mayor Prentiss and Mistriss Coyle are about to have their epic showdown, their rivalry has to be put on pause to combat the massive Spackle army that has marched on their city. The Spackle previously appeared in the trilogy but not as main protagonists. When the settlers from the Old World settled on the New, a massive Spackle war ensued with several thousand Spackle being enslaved to the settlers as part of the peace agreement. These enslaved Spackle are slaughtered wholesale by Mayor Prentiss in the second book, leading to the mobilization of the Spackle across the planet. In the third book, the settlers face extinction in the face of the imminent arrival of more settlers and the rivalries of the second book haven’t gone anywhere. Tension is high and Todd and Viola are doing all they can to save each other while saving the rest of humanity but will they succeed and keep their lives?? You’ll have to read the book to find out!
I talked over the entire trilogy with the aforementioned friend who introduced me to the trilogy and we both had some pretty strong opinions about each of the characters in a world where nothing is quite black and white. I found that this trilogy is incredibly insightful in its treatment of humans and the basic moral battle of good versus evil that has faced humanity for many millennia. Ness does a really good job of showing how easy it is for evil to seep into our lives but encouragingly shows how to confront that same evil. I cannot believe how much I enjoyed reading these books and would recommend them to YA lovers. It provides a layered and nuanced story that makes you question even your own perceptions of the world.
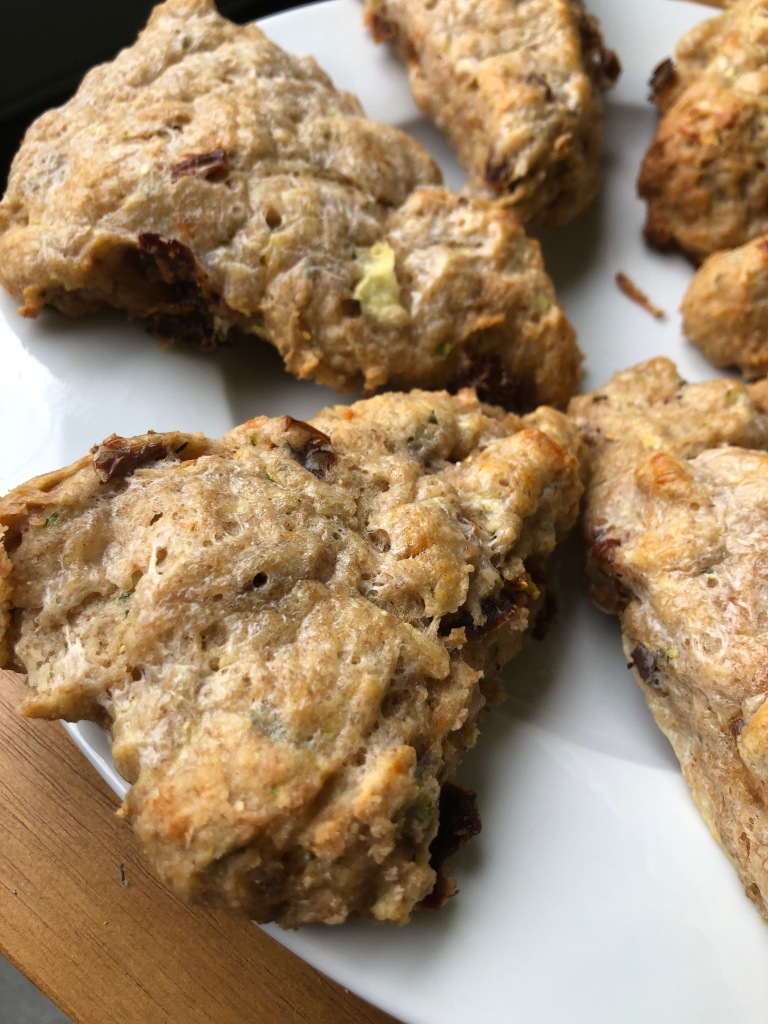
So I’m not sure how appropriate it is to call these scones but they sure are delicious! I ended up finding this recipe after discovering that my boyfriend had a container of buttermilk that was going to need to be used within the next two weeks. While I do love my Irish Soda Bread, I wanted to try and find something different that would use the buttermilk. They use the same elements as a traditional scone but they don’t have the same flakiness, I believe this is due to the zucchini. I made these over the past weekend and loved how much it tasted like pizza. I’ve only ever made one other savory scone and wasn’t quite sure how these would turn out. They were more of a hearty scone, probably due to the massive size of most of them and would make a good breakfast or lunch. They are slightly complicated so only attempt if you’ve had a little bit of experience with pastry or biscuits.
These are absolutely packed with flavor, from the zucchini to the sun dried tomatoes to the massive amount of grated Asiago!!! There are several technical pitfalls in this recipe and I was unable to avoid some of them but they still came out delicious! One issue is with the zucchini. While it makes a hearty addition to the scones and adds moisture, zucchinis add wayyyyy too much moisture most of the time. I squeezed out a great deal of moisture with a french press but I could have squeezed out even more. I found that the french press worked well but that I should have put the shredded zucchini inside the press in much smaller batches. You simply cannot get all the moisture out if you have too much in there. The other issue I had was underestimating how much dough this recipe makes. When I originally read about this recipe in the Skinnytaste blog, I thought it would make 12 mini scones. Oh boy, I was wrong on that! It makes 12 full size (generously portioned) scones and I really should have used a bigger mixing bowl. A food processor also really helps in this situation. I used to to both shred the zucchini and cut the butter into the dry ingredients. If you don’t have one, this can be done by hand so don’t get discourage but it will take a bit longer.
Savory Zucchini Scone Recipe
3/4 cup cold buttermilk (I use low-fat but I’m not sure how much it matters here)
1 large egg, beaten
1 cup All Purpose flour
1 cup Whole Wheat flour (You could use only All Purpose but I like the whole wheat)
1 1/2 teaspoons baking powder
3/4 teaspoon kosher salt
1/4 cup or 4 tablespoons butter, cold and cut into small pieces
1 cup shredded zucchini, squeezed of moisture
2 ounces Asiago cheese, shredded (Could substitute Pecorino Romano or Parmesan)
2.75 ounces sun dried tomatoes, minced (about 2/3 cup)
1 1/2 tablespoons fresh rosemary, chopped
Extra buttermilk to coat
Preheat oven to 375F. Spray baking sheet with non-stick or line a baking sheet.
Combine the buttermilk and egg in a bowl, stirring with a whisk.
Combine flours with baking powder and salt, stirring with a whisk.
In a separate bowl, combine zucchini, sun dried tomatoes, cheese, rosemary and set aside.
Cut in chilled butter into the dry ingredients, by hand or using a food processor until it looks like coarse meal.
Gently fold in the ingredients from step four. Make a well in the middle of the dough and add the buttermilk mixture.
Fold the mixture together until it starts to come together then turn out onto a floured surface. Knead lightly then form into a 10″ circle.
Cut into 12 wedges and brush lightly with buttermilk on the top of each wedge. Place on the lined sheet and bake 25-30 (up to 35) minutes.
Remove from oven and let cool. Eat warm and enjoy!
It’s been a hot minute since I’ve had time to review a book but I absolutely raced through this one! I started in on a Sunday night and was finished by the next evening, I just couldn’t put it down! This novel is the second in the Chaos Walking trilogy by Patrick Ness. I was introduced to this trilogy by a dear friend from high school who kindly provided the first one, “The Knife of Never Letting Go”. Unfortunately, I was hooked on that book and finished it with similar speed and my friend did not have the rest of the trilogy so I had to wait! I was able to find the second and third books on Thriftbooks at the end of July and was very excited to dive into the world of Patrick Ness once again!
The Chaos Walking trilogy tells the story of the settlements on a New World after the inhabitants of the Old World had to leave it. The series specifically follows Todd, a young man born in the New World settlement of Prentisstown where there are no women, and Viola, a scout from a new group of settlers from the Old World. “The Knife of Never Letting Go” follows Todd and Viola as they race to stop Mayor Prentiss from conquering the other settlements of the New World. The second book focuses on what happens after they fail and Mayor Prentiss becomes President Prentiss of the New World. Viola and Todd are separated and have to find themselves before they can find each other once again.
This novel is nuanced and absolutely devastating at points. It asks the questions that we are often afraid to ask in our day and age of the Trump Presidency. It asks how far will you go to save your own skin? Ness also explores the power of the individual throughout the novel which I found very thought provoking. I think this book is appropriate for 10 and up and especially for adults but it does contain dark topics so read with discretion. I cannot wait to read the next one to learn the final fates of Todd and Viola.
This is one of my favorite discard recipes. It’s incredibly versatile and can feed a family really easily. During this past summer, I made this recipe at least once every two weeks and it was a hit every single time. This recipe is from King Arthur Flour which has a fantastic repository of sourdough discard recipes. With this recipe, you are able to merge the instincts of a chef and a baker because both creativity and precision are needed to make this recipe a success. For the flavor combinations, go with whatever you or your family like the most. At the start of summer, I paired chicken sausage with broccoli or whatever frozen vegetable was around and I’ve recently taken to pairing Italian chicken with mushrooms which is a delicious combination that I never really appreciated properly! The dough in this recipe can be paired with whatever is in your fridge; just come up with a central element or two and the dough can be tailored to compliment it.
The technical side of this recipe isn’t daunting but the little things can get you. I often pour spices into the dough without proper measurement because it’s more of gut feeling at this point. While fun, improvisation with the dry ingredients can get you into hot water with your balance of wet and dry. If adding more than 5 grams of extra dry ingredients, add a little more water, just enough to make the dough come together. My discard can also be a little sticky sometimes and that mean needing to add more or less liquid to your dough. Also, in terms of using a pizza pan, this most recent bake was the first time that I had used one and I adored it! If you end up making pizza regularly, a pizza pan is a wonderful addition but it’s also another very large pan that will need a home in your kitchen. A regular sheet (half or quarter depending on recipe size) will do just fine. However, I would recommend getting a pizza cutter; they are incredibly useful and I now use mine almost everyday. This recipe can also be halved easily to make a smaller pizza, the pictures on this post are from a halved recipe. If halved, you may need to add slightly more water when mixing. However you get to making your pizza, enjoy the process! Making pizza dough is easy enough to do with the whole family or with a loving partner so have fun and go make that dough!
Sourdough Discard Pizza Recipe
227 grams (1 cup) discard sourdough starter
113 grams (1/2 cup) warm water
298 grams (2 1/2 cups) All Purpose flour
1 teaspoon kosher salt
1/2 teaspoon instant yeast (use 3/4 teaspoon for active dry)
Assort spices or pizza dough flavoring (This is more of a gut addition, I add spices based on the flavorings I enjoy, my most common additions are onion powder, garlic powder, and oregano or Italian seasonings)
Combine all ingredients and knead for about seven minutes by hand or with a mixer. The dough should be smooth and not sticky.
Roll the dough into a ball and place into a greased container. Let rise 4 hours. For a quicker rise, double the amount of yeast)
Once risen, the dough can be divided to make two twelve inch pizzas or one large pizza. Either way, grease a pizza pan or sheet pan and stretch it to desired shape.
Let rest 15 minutes. If the dough has creeped back any, you can re-stretch it. From here, you can bake immediately or wait until the dough reaches your desired thickness. I usually allow an addition 20-30 minute rise to get a nice solid crust. Cover the dough during its rise to prevent a dry crust forming over the dough.
Preheat oven to 450F.
Add sauce and toppings to pizza but hold back the cheese. Bake un-cheesed pizza for 5-10 minutes (shorter for thinner pizzas).
Remove from oven and add cheese then bake a further 5-7 minutes.
Remove from oven and enjoy! It stays good in the refrigerator for up to five days!
So this started as a big mistake on my weeks produce box. Since coming back to Baltimore for a slightly strange school year, I decided to sign up for Hungry Harvest which is a service meant to rescue ugly or excess produce and was started at the University of Maryland! In my first order, I didn’t quite read the fine print while customizing my order and accidentally ordered 30+ pluots…Yikes! While I do love pluots and my boyfriend has grown fond of them, there is no way that the two of us could consume that many without starting to hate them. At the suggestion of Jason, I turned my pluots into a modified tarte tatin and it was delicious to eat! I will concede that this is not a “true” tarte tatin as it does not have a caramelized bottom but I think the maple syrup base adds more flavor than the overwhelmingly sugary taste of caramel. I would like to make some changes to the recipe at some point so if I have time to experiment, I’ll update the recipe.
For this recipe, I ended up making my own puff pastry which I think went rather well for my first attempt. There weren’t as many layers as I was hoping for but I think it was an impressive showing for my first attempt. Pluots also have a high volume of water and they may have soaked the pastry a little too much, retarding the rise of the layers of pastry. Either way, Jason and I have nearly polished off the whole tart in two days which I think is rather impressive! I also remembered after the fact that for a liquid filling, you normally cut a little steam hole in the top of the tart in order to let the moisture escape. Guess who forgot their steam hole? I can’t wait to make this again with a few improvements. I also really enjoyed the process of making puff pastry, with a cold countertop, it wasn’t nearly as daunting as it looks on television. I did have much more time to leisurely make the pastry which I think is key for keeping the butter chilled. The pastry can be made throughout the day between larger tasks and then rested overnight before use. Obviously, if you’re rushed for time, do NOT try to make your own pastry! As Ina Garten says, if you can’t make your own, store-bought is fine. Especially if you’re a novice baker, pastry can be tricky and finicky and you may have more failure than success but I encourage you to keep going, you will get there one of these days!
Pluot Tarte Tatin Recipe
For the Puff Pastry (Paul Hollywood’s Recipe)
Makes double what you need for the tarte tatin, roughly 600 grams
150 grams chilled Bread flour
150 grams chilled All Purpose flour
Pinch of salt (1/4 teaspoon)
2 large eggs
100 milligrams cold water
250 grams chilled unsalted European-style butter
Combine the flours, salt, eggs, and water in a large bowl and gently mix to an even dough. Transfer to a floured surface and knead for 5 minutes or until smooth (up to 10 minutes). The dough will feel tight. Shape into a bowl, wrap in plastic, and chill in the fridge overnight.
Flatten the butter into a rectangle, 15″x 7″ and return it to the fridge, overnight or for at least an hour to harden.
Roll out the dough to 24″x 8″ and place the butter on the dough so it covers the bottom two-thirds of the dough.
Fold the exposed dough on the top over the butter and then fold the bottom butter covered third over the top flap. Pinch the edges together to seal and put into a plastic bag to chill for 1 hour.
Take the dough out of the fridge and place on a slightly floured surface. Roll it out to a rectangle and fold the bottom and top quarters to meet in the center. Fold this dough in half and chill in a bag for another hour. (This is a book turn! It creates lamination very quickly so if you want more layers, make the next two turns book turns rather than single turns)
Take the dough out and roll it into a rectangle. Fold down the top third of the dough and then fold up the bottom third to make a square of dough. Wrap and chill for another hour. (This is a single turn)
Repeat step 6 and chill overnight. After overnight chill, the pastry can be used at will or frozen up to three months. If frozen, thaw in the fridge the night before.
For the Tarte Tatin (Adapted from Jamie Oliver’s Plum Tarte Tatin recipe)
Serves about 8,
600 grams ripe pluots, de-pitted and halved
1 teaspoon ground cinnamon, divided
120 milligrams maple syrup
30 milligrams water
320 grams puff pastry, rolled into a circle
Vanilla Ice Cream for serving
Preheat oven to 425F.
Warm a cast-iron skillet over medium heat.
Add pluots to the pan with the water and cook for 1 minute. Place them carefully for decorative purposes, a tarte tatin is turned upside down to serve so the base ends up on top.
From a height, sprinkle 1/2 teaspoon cinnamon over the pan and evenly pour the maple syrup over the pluots. (The cinnamon is sprinkled from a height to prevent it being burned in the pan, which is v unpleasant, and it helps it to spread evenly on the pluots)
Place the pastry over the pluots and using a spoon or your hands, press the pastry to the edges and over the pluots. Trim excess pastry and use it to patch any holes. Use a paring knife to cut a small hole in the center to allow steam out.
Bake at the bottom of the oven for 20-25 minutes or until the pastry is golden and puffed up.
Using GOOD and LONG oven gloves, place a plate over the skillet and flip the tarte out of the pan. If properly baked, it shouldn’t stick at all.
Dish up with ice cream and sprinkle remaining cinnamon on top. Enjoy!
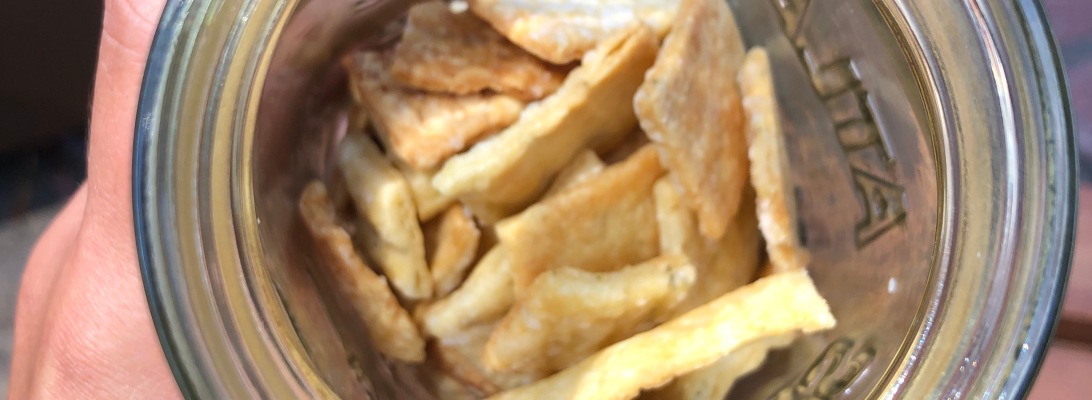
These crackers are so GOOD! I had not made a ton of crackers before this summer but discovered that it was a great way to use up my discard and began making them all the time! Earlier in the summer, I would make these and they would last a week or two, but with my brother home, my parents are lucky if they can get a taste before they disappear into the black hole of my brother’s appetite! My parents and I use them for our cheeseboard but my brother prefers to eat them as snacks throughout the day. It’s a versatile cracker that you can do a lot or a little with and it’ll turn out really tasty each time!
That being said, this recipe is adapted from the King Arthur Flour website but I’ve made some pretty significant changes. One is to the type of flour used; while the original recipe used whole wheat flour, I’ve started to substitute with einkorn flour and I love the additional flavor! The einkorn flour was purchased for another recipe but I think I used it all on these crackers because I couldn’t get enough of the slightly cheesy taste these crackers had. I also have started to substitute olive oil for the butter that was used in the original recipe. Often times, you can substitute one type of fat (such as butter) for another (olive oil) in recipes and it won’t change the final product very much. Other times, if you substitute a fat, you could ruin a whole recipe so do so judiciously. I switched to using olive oil because it cut down on the amount of time that the dough needed to rest before being rolled and cut. I would also highly recommend that if you end up making these crackers frequently, get a pizza cutter. It makes a world of difference when you’re trying to cut the dough into cracker size. My crackers are often not the neatest in the world because I cut them quickly but they’re still delicious!
A note on the flavor combinations. You can do a LOT with these crackers! My brother’s favorite flavor combination is dill with lemon vinaigrette and sea salt but there’s many other combinations to be had. Another favorite is rosemary and orange or thyme and lemon. I try to use fresh herbs but the dried often pack more punch so if using fresh, double or triple the amount of herbs. I’ve also experimented with adding in a little cheese powder but I found that is was both unnecessary with the einkorn flour and often caused the crackers to burn a little faster than usual. Be creative and have fun, these crackers provide a great base for you to experiment with!
Sourdough Discard Crackers Recipe
113 grams Einkorn or Whole Wheat flour (1 cup)
1/2 teaspoon kosher salt
248 grams sourdough discard (1 cup)
1/2 tablespoon dried herbs of choice (up to 2 tablespoons for fresh herbs)
57 grams olive oil (1/4 cup) (Can use butter)
Additional olive oil and kosher salt to finish
Mix together all ingredients to make a smooth, non-sticky, cohesive dough. May have streaks if using olive oil, that’s okay!
Divide in half, put onto parchment-lined baking sheets and let rest at room temp up to an hour.
Preheat oven to 350F.
Flour a rolling pin, the dough, and the parchment that it’s resting on. Roll out to 1/16 of an inch. Paint lightly with olive oil and sprinkle salt onto the dough. Cut into 1 inch squares with a pizza cutter or a knife.
Prick each cracker with the tines of a fork before putting it in the oven.
Bake for 25 minutes. Halfway through, reverse the placement of the pans in the oven so that the top goes on the bottom and the crackers that were closest to the oven door are now closer to the inner wall of the oven.
Remove once baked and let cool on a wire rack. Once cool, eat and enjoy or store in an airtight container. For full flavor, they last no longer than a week out in the open but if you’re okay with a lil less flavor, they’re good for up to two weeks.
Wow! I just finished this book a night or two ago and wow! We love a book that sets up the next one in a series….Honestly, it was a great read for me but I do get a little frustrated when it feels like the whole book is just the lead up to another book. That being said, this book was absolutely action packed! There are queens and assassins and ambushes and prisoners and a little bit of history! This book is actually the fourth in a series by LaFevers and I have thoroughly enjoyed both this book and the preceding novels.
LaFevers recreates Brittany during the war torn years before it merged with the larger state of France. The main characters, Sybella and Genevieve are daughters of death in a literal sense that the Breton god of Death is their actual father but they’ve also been schooled in the killing arts. Honestly, this book is absolutely classic Young Adult fiction and I absolutely devoured it. Sybella is definitely my favorite character of the book, she had her stand alone novel as the second in the series but she is no less a delight to follow in this novel. I also find her character highly relatable and wish that I had her AMAZING skills. I would recommend this novel and series to a reader on the older end of the young adult reading spectrum, probably no one younger than 15 as there is some content of a sexual and adult nature. That being said, I did start the series when I was slightly younger than 15 so who am I to say anything about it. I hope that you enjoy LaFevers’ work just as much as I did, there’s really nothing like diving into the rich world of Brittany and the complex female characters that populate this series.
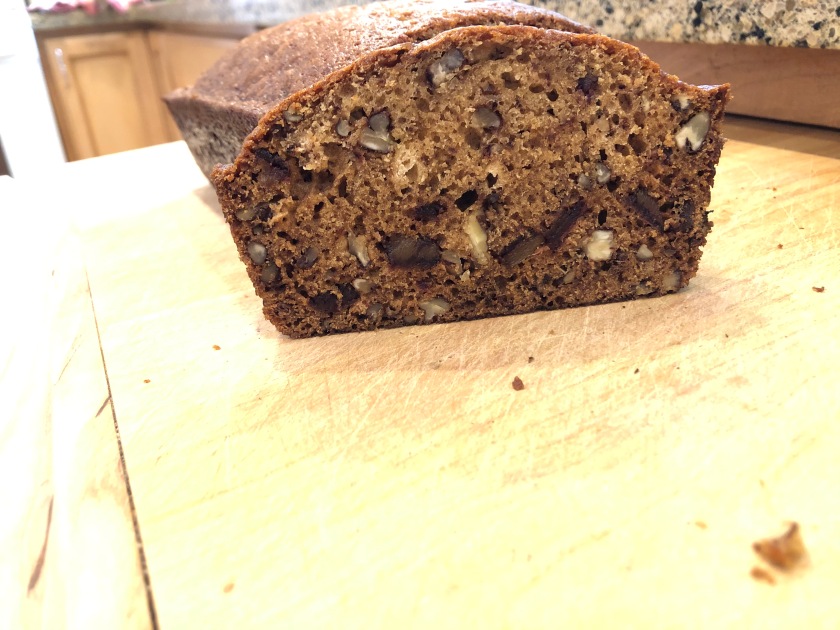
This is one of the more personal recipes that I could possibly share. This recipe, as the title says, comes from my grandmother. For years, I heard my mother longingly speak of her mother’s date nut bread, which would be made as Christmas presents for loved ones. During our extended sheltering at home during the pandemic, my mom and I found a big family recipe book as we cleaned out the garage, which just so happened to contain a recipe for my grandmother’s famous date nut bread. I feel really lucky that we were able to find the recipe book in the first place and reading through it helped to connect me to my mother’s side of the family. My grandmother passed away shortly after my birth and I’ve always wished that we could have had just a little bit more time. While making this recipe, I felt just a little bit closer to my grandma.
This recipe is definitely a little interesting to make but is not hard at all! One of the first parts of this recipe calls for boiling water mixed with baking soda and dates. While I couldn’t find any real reasoning for this in the rest of the recipe, after a little bit of internet sleuthing, I surmised that the water is meant to help the baking soda dissolve and not get stuck on the dates. I also think that this recipe may be meant for two small loaf pans rather than the medium sized loaf pan that I used. In the recipe notes, it said that it made two loaves, but I found it barely filled my tin. I almost made it in my individual scone pan from King Arthur which may have helped it to bake quicker and more evenly. Due to the size of the pan I baked it in, I had to add an extra 20 minutes to the baking time during which the edges started to get a little crispy. I really enjoyed this recipe and it made me smile to see my mother very enthusiastically devouring the date bread! I hope you enjoy baking but be warned, it takes longer to bake than it does to assemble the ingredients!
Grandma’s Date Nut Bread Recipe
1 cup dates, chopped and de-pitted
1 cup boiling water
1 teaspoon baking soda
1 cup granulated sugar
2 eggs
1 tablespoon shortening/butter (original recipe called for shortening but I used butter this time)
1 cup nut meat (I chopped pecans but any sweeter raw nut would work, candied nuts may be too sweet to eat in the bread)
1 1/2 cup All Purpose flour
1 teaspoon vanilla extract
Preheat the oven to 325F.
Combine the dates, boiling water, and baking soda and let stand while doing step 3
Cream together sugar, eggs, and shortening/butter. Ensure it is thoroughly mixed and almost fluffy.
Combine dates and sugar mix. To the combined mix, add the nut meat, flour, and vanilla extract.
Pour into loaf pan and bake 1 hour, 20 minutes if using a large loaf pan or 1 hour for smaller loaves. Check for doneness by sticking a knife in the middle of the loaf, if it comes out clean then it’s ready to come out of the oven.
Let loaf cool and enjoy warm or at room temperature with a bit of butter slathered on top or just plain if you like!
Ah yes, yet another book review regarding my research on France! Oh boy! Actually, my mother very kindly got me this book while I was recovering from my wisdom teeth surgery, which took much longer that I had thought. She is a thoughtful and wonderful person and I am so glad that she found this book! It was an absolute delight to read and can be read very fast or very slow. The book is structured into small chapters that each contain an anecdote about French cuisine and its’ link to French history. As I haven’t done that much research into the past of France, it was a good primer on French history for a foreigner. It also featured all sorts of regional French cuisine and was a tasty exploration of French food.
This book can be read by readers of all ages and enjoyed by all! It did make me a little hungry every time that I cracked it open but that’s a minor problem and not a bad one to have! It was a joyous celebration of the role of food in the storied past of France while tastefully acknowledging the darker side of French history. One of the things that I thought was well-addressed on a surface level was France’s colonial past and direct role within the North Atlantic Slave trade. This book was also a good debunker of many french myths surrounding their own cuisine and was an all-around good read! I would absolutely recommend this book to all and hope that many more get to enjoy the delights of this particular tome!